 Switching to Platform.sh can help IT/DevOps organizations drive 219% ROI
 Organizations, the ultimate way to manage your users and projects


Platform.sh provides a host of useful tools that simplify the lives of the good people in DevOps. Features in development can have their own isolated environments, complete with exact copies of production data. Every time you create and test a feature, you're simultaneously testing the build and deploy process of your application. Great!
You might be asking yourself how to get started with your existing application. Don’t worry, migrating can be simple using the newest tools in our management console: our new, streamlined Project Creation, with our all new Project Setup Wizard.
How to get started
Create a free trial account with Platform.sh. You'll have 30 days to test out a development project. By the end of that trial, you'll evaluate how our tools will fit in with and improve your existing workflow. We think you’ll be over the moon.
First, let's work with a local copy of your codebase in isolation. We'll use that as a starting point for now, but integrating with your existing remote repository (on GitHub, GitLab, or Bitbucket) is just as simple once you've gotten used to configuring an app on Platform.sh.
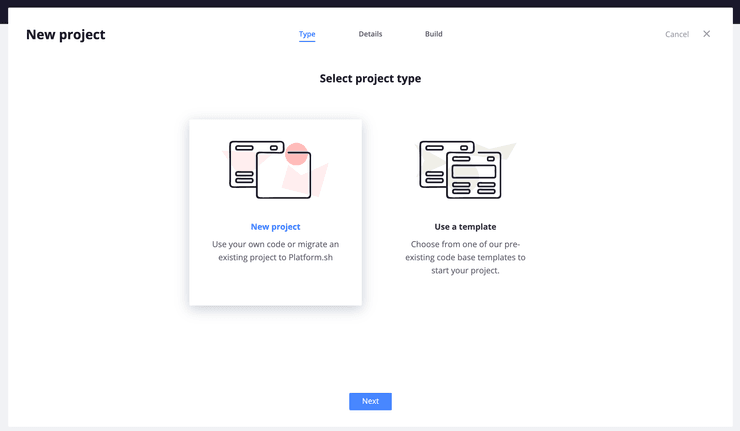
Once you've signed up, our Project Creation will allow you to set the code base for the soon-to-be-created project, and for that you have two options. First, you can initialize the project with one of our many official template projects, pre-configured to build and deploy smoothly on Platform.sh.
While we won't select this option now, consulting a template project can be a great reference to guide you through the details of configuring your application. Who knows? Maybe we already have a maintained template that's a close match to what you're trying to deploy! Check out the Templates Organization to see.
Since we're migrating your existing project select the first option on the left, "New Project," to create an empty remote repository on Platform.sh, ready to have your code added to it.
In the final step, name the project and choose the region it will exist in. Select the region closest to where the bulk of your visitors are, then click the “Create project” button. A prompt will appear that describes the features of your plan: it's size, price, as well as the number of development environments and users come with it. Once you've read through these features, click "Continue" to initialize the project.
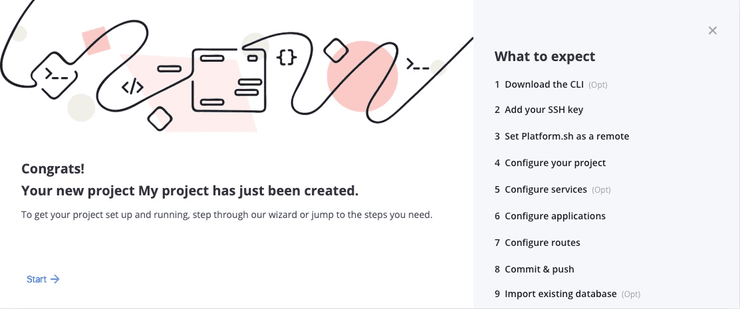
The Project Setup Wizard
With your first project created, you'll now have access to our new management console, which is the front page of your project. On the left, you'll see some additional information that comes with your free trial:
- You've selected the "Development" plan and named it "My project."
- The project comes with four environments. Each branch of your repository can become its own live site, and the
masterbranch is your production application environment.
To help you migrate your project onto Platform.sh, we recently introduced a new tool to the management console to help simplify the process: the Project Setup Wizard. It will take you through the steps to configure your application, and it will be there as a guide each time you create a new project.
Setting up the project
After installing the Platform.sh CLI, you’ll have to add your public SSH key to your account to interact with the project repository. In the Project Setup Wizard, you can paste in the public key and move onto the next step.
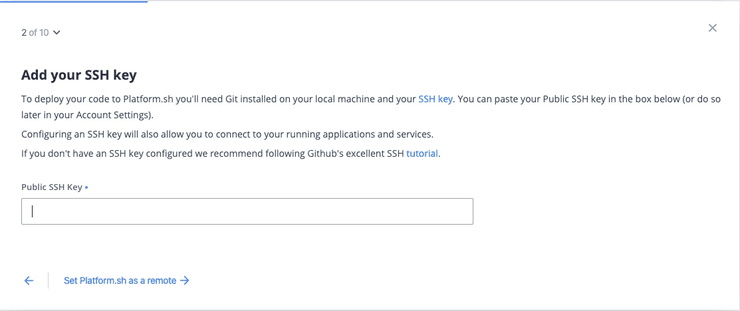
If you don’t already have a public SSH key to add, follow the tutorial link at the bottom of the slide to do so.
Since you have a local copy of your codebase, you'll need to set Platform.sh as a remote for it. The Project Setup Wizard provides the command:
platform project:set-remote <project ID>where the project ID is the primary identifier for a project on Platform.sh.
Now that your local repository knows about the project, it's time to start configuration. Every project needs at least three configuration files to deploy on Platform.sh:
.platform/services.yamlDefines the services the application will have access to.platform.app.yamlConfigures how the application will build and deploy.platform/routes.yamlConfigures how requests will be directed to the application
The Project Setup Wizard will take you through the steps to configure each of these files individually, so create empty ones directly in your project root from the onset.
mkdir .platform && touch .platform/routes.yaml && touch .platform/services.yaml && touch .platform.app.yamlConfiguring services
Now, let's say you want to migrate a ExpressJS app, one that uses PostgreSQL as the primary database. The first configuration step enables you to interactively select PostgreSQL configuration for your services.yaml file:
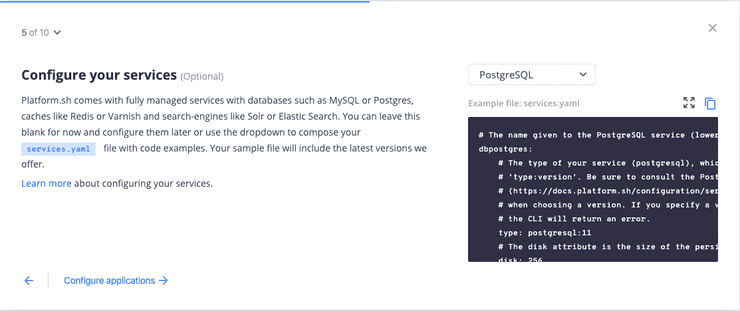
You can copy the content of the generated file directly into your .platform/services.yaml.
# The name given to the PostgreSQL service (lowercase alphanumeric only).
dbpostgres:
  # The type of your service (postgresql), which uses the format
  # 'type:version'. Be sure to consult the PostgreSQL documentation
  # (https://docs.platform.sh/configuration/services/postgresql.html#supported-versions)
  # when choosing a version. If you specify a version number that isn’t available,
  # the CLI will return an error.
  type: postgresql:11
  # The disk attribute is the size of the persistent disk (in MB) allocated to the service.
  disk: 256
If PostgreSQL is the only service your application requires, then your basic service configuration is complete. Of course, depending on the service, some additional fine-grained configuration is also available and can be found for each of our services in the public documentation.
Configuring your application
The next thing the Project Setup Wizard will help you configure is the .platform.app.yaml file. Once again, there's a dropdown bar that will take care of the first step: selecting a runtime environment for the application container.
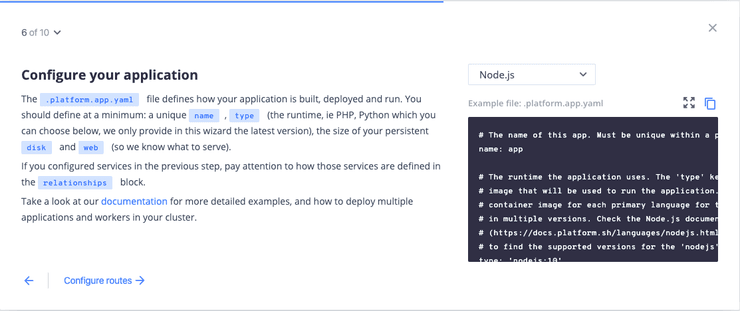
The Project Setup Wizard automatically chooses the most recently supported version of the runtime for your application (named app). It also matches your service configuration from the previous step to connect the PostgreSQL database to the application using the relationship key.
Depending on the language you choose, the Wizard may also include a key by default that you can use to control how your build and deploy processes run on Platform.sh: hooks. That key will then contain two possible attributes:
- A
buildhook, that defines what you want downloaded to build the application while the file system is writable. - A
deployhook that's run after the application has been started, but before it’s started accepting requests. The filesystem is read-only at this point, but services are accessible.
One of the other important concepts the Project Setup Wizard introduces you to through this file is mounts. During the build phase, you can download and save anything your application requires to build. But once it starts its deploy phase, the file system becomes read-only. If your deployed application requires write access at runtime, you can define mounts for those directories. If your app doesn't require write access, mounts can be removed.
Finally, the web key configures how the application is exposed. For a Node.js application, this defaults to directly serving the entry point index.js.Since our simple Node.js application doesn't require hooks at the moment, we can remove that section and use the rest of the generated configuration file:
# The name of this app. Must be unique within a project.
name: app

# The runtime the application uses. The 'type' key defines the base container
# image that will be used to run the application. There is a separate base
# container image for each primary language for the application,
# in multiple versions. Check the Node.js documentation
# (https://docs.platform.sh/languages/nodejs.html#supported-versions)
# to find the supported versions for the 'nodejs' type.
type: "nodejs:10"

# The following block defines a single writable directory, 'web/uploads'
# The 'source' specifies where the writable mount is. The 'local' source
# indicates that the mount point will point to a local directory on the
# application container. The 'source_path' specifies the subdirectory
# from within the source that the mount should point at.
mounts:
  "web/uploads":
    source: local
    source_path: uploads

# The relationships of the application with services or other applications.
#
# The left-hand side is the name of the relationship as it will be exposed
# to the application in the PLATFORM_RELATIONSHIPS variable. The right-hand
# side is in the form '<service name>:<endpoint name>'.
relationships:
  postgresdatabase: "dbpostgres:postgresql"

# The 'web' key defines a single web instance container running a single web server
# process (currently Nginx), behind which runs your application. It configures
# the web server, including what requests should be served directly
# (such as static files) and which should be passed to your application.
# DOCS: https://docs.platform.sh/configuration/app/web.html
web:
  # The 'commands' key defines the command to launch the application.
  # DOCS: https://docs.platform.sh/configuration/app/web.html#commands
  commands:
    # The 'start' key specifies the command to use to launch your application.
    # If the command specified by the 'start' key terminates it will
    # be restarted automatically.
    start: node index.js
Configuring routes
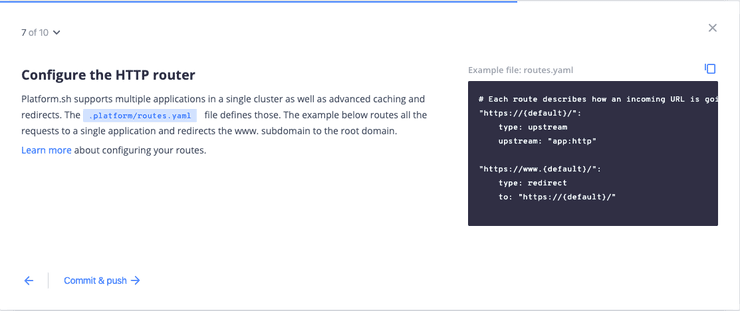
The final configuration file that needs to be written for your application to deploy is the routes.yaml file. From this file, you can configure subdomains, wildcard routes, and the caching for every route of your application.
By default, the Project Setup Wizard gets you started with the simplest route configuration, one that sets up an upstream and redirect route for a single primary application, app.
Pushing to Platform.sh
Now that all of the configuration files have been written, you can commit and push them to the remote project on Platform.sh.
git push -u platform masterWhen the build has completed and the application has been deployed, you can visit the live site using the CLI command:
platform urlThat’s it! Your entire codebase has been migrated to a project, and configured to run on Platform.sh. If your application has failed to deploy, there may still be some additional configuration steps specific to your application that have to be included. Make sure to visit the documentation and consult one of our template projects to determine what changes may need to be made.
Data and files
Now that the codebase has been deployed on Platform.sh, it isn't a successful migration until your uncommitted data goes with it. The Project Setup Wizard will take you through the commands you’ll need to import it all.

Create a PostgreSQL dump, and import it to the dbpostgres service with the command:
platform sql < my_database_snapshot.sqlIf your application requires write-access—and you configured mounts that need to contain additional files—the last step of the Project Setup Wizard provides the command to do so:
platform mount:upload --mount web/uploads --source ./uploadsHere, files located in the uploads subdirectory of the local project are imported into the web/uploads mount.
That's it! As you followed through the Project Setup Wizard steps, we trust migrating your application to Platform.sh has been that much easier.
Now, feel free to play around a bit with your new project. Create a new active environment by pushing a local branch to Platform.sh and activating it using the CLI command platform environment:activate <branch_name>. You’ll see that an exact copy of all of your data is available in the environment, despite being completely isolated from Master. You can use development environments to update your version of PostgreSQL by committing a change to your services.yaml file and running your tests on that environment.
If you like what you see, you can apply your configuration changes to a pull request on your primary GitHub, GitLab, or Bitbucket repository. Setup the integration linked above, run your tests, and merge.
Now you’ve fully migrated! From now on, every subsequent pull request can be its own isolated live environment, complete with an exact copy of all of your production data. Need to upgrade your database? Edit your services.yaml file for the new version you want, open a pull request, and an environment will be deployed to test the change.
Platform.sh isn't just hosting, after all, but a complete DevOps tooling platform. It’s been engineered to leverage Git from the start. You don't have to spend any time pulling production data to test a new feature because exact copies are automatically created as a consequence of branching. Your configuration is committed, so onboarding new developers takes days instead of weeks—all they need to do is look at the codebase, and they can view or update the infrastructure with another commit. Test the new environment, and when it passes your QA process, you can be confident the app will run the same way when merged into production (even on Friday).
These tools will save you time and headaches, so you can focus your energies on your application in the long run. So, welcome to Platform.sh: deploy fast, deploy often, deploy Friday.
Resources
Now that you've migrated, check out the number of resources provided by Platform.sh that will help you leverage all we have to offer: