 Switching to Platform.sh can help IT/DevOps organizations drive 219% ROI
 Organizations, the ultimate way to manage your users and projects

This week we've covered how we run three very different applications on Platform.sh:
- Brightspot, a Java CMS
- Hugo, a Go-based static site generator (SSG)
- GatsbyJS, a React-based SSG and progressive web app.
Today, we'll wrap up with the SSG that started the static trend in web content management, and remains the most popular: Jekyll.
Jekyll is written in Ruby, and as with Hugo and Gatsby, you can take advantage of Platform.sh's Git-driven workflow to compile any code or content changes on every git push. Your team is able to work on multiple initiatives at once and merge changes into production with ease.
While we've spaced the publishing of this blog series over four days, the actual work needed to get each CMS or SSG running on Platform.sh was minimal. Platform.sh is a polygot tool for developing and delivering applications, so we've designed it from the beginning to be adaptable to just about any language or framework with minimal adaptation or training required.
Beyond the examples we've published here, we've made the whole process easy enough even for less technical (or just plain rusty) users to get new apps running.
Onward to the how-to
If you've followed along with our series so far, you'll see that running Jekyll on Platform.sh isn't much different from running other SSGs. The particulars are in the configuration of your local environment, and the .platform.app.yaml file, for the most part. You can also start from a ready-to-run Jekyll example on GitHub, or if you have your own Jekyll application already you can skip ahead to the Platform.sh-specific bits.
1. Setup your local machine
You'll need 3 tools to deploy your Jekyll site on Platform.sh:
- ruby and rubygem (installation varies by OS and package manager
- jekyll:
sudo gem install bundler jekyll - Optional: the platform.sh cli tool
The links above refer to installation instructions for each tool.
On macOS, you can use homebrew to install your dependencies quickly.
brew install ruby
sudo gem install bundler jekyll
brew tap homebrew/homebrew-php
brew install curl git php72-cli php72-curl
curl -sS https://platform.sh/cli/installer | php
2. Bootstrap your Jekyll project
We need to create a new Jekyll folder from the command-line:
$ jekyll new jekyll-hello
Running bundle install in /media/psh/customers/jekyll-hello...
Your user account isn't allowed to install to the system RubyGems.
  You can cancel this installation and run:

      bundle install --path vendor/bundle

  to install the gems into ./vendor/bundle/, or you can enter your password
  and install the bundled gems to RubyGems using sudo.

  Password:
  Bundler: Fetching gem metadata from https://rubygems.org/...........
  Bundler: Fetching gem metadata from https://rubygems.org/.
  Bundler: Resolving dependencies...
  Bundler: Fetching public_suffix 3.0.3
  ...
New jekyll site installed in jekyll-hello.
You can now run the development server:
$ cd jekyll-hello && bundle exec jekyll serve
Configuration file: jekyll-hello/_config.yml
            Source: jekyll-hello
       Destination: jekyll-hello/_site
 Incremental build: disabled. Enable with --incremental
      Generating...
       Jekyll Feed: Generating feed for posts
  Bundler: /var/lib/gems/2.5.0/specifications
                    done in 0.288 seconds.
 Auto-regeneration: enabled for 'jekyll-hello'
    Server address: http://127.0.0.1:4000/
  Server running... press ctrl-c to stop.
Browse to http://localhost:4000/ to check that everything is working as expected.
The npx template already creates a basic git repository:
Create a new git repository inside that folder:
git init .
git add .
git commit -m "Init jekyll"
3. Create your Platform.sh project
We've shown you how to create a new Platform.sh project through the Web UI, as well as through the Platform.sh Command Line Interface (CLI). Did you know that you can manage your Platform.sh experience entirely through our API, too?
Let's create a new project to test Jekyll, via the Platform.sh API. We'll assume that you've already registered for a Platform.sh trial account, and you're starting a new project. If you want to skip this part, the instructions for creating a new project are the same as in our first post of this series.
For simplicity, we'll use curl for this example, but you could use just about any tool that can make a HTTP request.
First, let's get an authorization token. This requires that you've generated an API token to access the Platform.sh API.
Once you have your API token, you'll need to generate an Oauth access token, which you'll use to authenticate your subsequent requests.
curl -X POST \
   https://auth.api.platform.sh/oauth2/token \
  -H 'Authorization: Basic cGxhdGZvcm0tY2xpOg==' \
  -H 'Content-Type: application/json' \
  -H 'cache-control: no-cache' \
  -d '{
    "grant_type": "api_token",
    "client_id": "platform-api-user"
    "api_token": "<your api token goes here>"
}'
The client_id should always be platform-api-user to differentiate the request from internal applications. Your response should look something like
{
    "access_token": "<your access token will appear here>",
    "expires_in": 3600,
    "token_type": "Bearer",
    "scope": "account"
}
This access_token will allow you to authenticate subsequent requests to the API until it expires. Once you've got an access_token, you can request a new project like so:
curl -X POST \
  https://api.platform.sh/subscriptions \
  -H 'Authorization: Bearer <your access_token>' \
  -H 'Content-Type: application/x-www-form-urlencoded' \
  -H 'cache-control: no-cache' \
  -d 'project_region=ca-1.platform.sh&project_title=jekyll-blog'
Note the two required parameters - project_region which specifies where you want to deploy your project (in this case, our Canada region), and project_title, which is self-explanatory. We've left other options set to their defaults—including project plan size, environment count, and storage. You can adjust all of these after you've provisioned your project.
The API will return a JSON formatted output with the details of your new project.
{
  "id": "<your subscription id>",
  "status": "requested",
  "owner": "<your owner GUID>",
  "owner_info": {
    "type": "user",
    "username": "<your username>",
    "display_name": "<your displayname>"
  },
  "vendor": null,
  "project_id": null,
  "project_endpoint": null,
  "project_title": "jekyll-blog",
  "project_region_label": "Canada",
  "project_ui": null,
  "plan": "development",
  "environments": 3,
  "storage": 5120,
  "user_licenses": 1,
  "project_region": "ca-1.platform.sh",
  "project_options": {
    "defaults": {
      "settings": {
        "use_drupal_defaults": false
      },
      "variables": [],
      "access": []
    },
    "enforced": [],
    "regions": [],
    "plans": []
  },
  "enterprise_tag": null,
  "locked": null,
  "invoiced": null,
  "services": [],
  "support_tier": null,
  "_links": {
    "self": {
      "href": "https://api.platform.sh/subscriptions/<your subscription id>"
    },
    "owner": {
      "href": "https://api.platform.sh/profiles/<your owner GUID>"
    }
  }
}
You've now got a home for your new Jekyll project on Platform.sh.
Using the API, you can do a lot more; in fact, you can do everything through the API that you're able to with the web UI and CLI. However, for the scope of this post, let's retrieve the details of our new Git repo from the Web UI. On the main project screen, click Git remote and copy it. 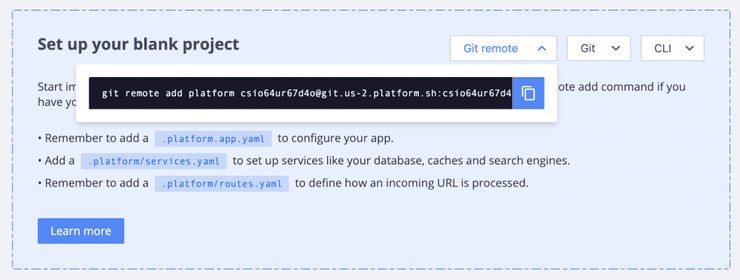
Add the remote to your local project:
git remote add platform <project ID>@git.<region>.platform.sh:<project ID>.gitDon't push anything for now. You still need to add the Platform.sh configuration.
4. Set up the
Platform.sh relies on yaml configurations to configure the different containers to deploy.
Create the .platform.app.yaml file at the root of your project, and add the following code:
# .platform.app.yaml

# The name of this application, which must be unique within a project.
name: "jekyll"

# The type key specifies the language and version for your application.
type: "ruby:2.5"

# The hooks that will be triggered when the package is deployed.
hooks:
  # Build hooks can modify the application files on disk, but not access any services like databases.
  build: |
    bundle install
    bundle exec jekyll build

# The size of the persistent disk of the application (in MB).
disk: 5120

# The configuration of the application when it's exposed to the web.
web:
  locations:
    "/":
      # The public directory of the application relative to its root.
      root: "_site"
      index: ["index.html"]
      scripts: false
      allow: true
Again, the web section is nearly identical to the Hugo version and Gatsby version, just with a different root path for Jekyll. In this case, since the Ruby container has no build flavors the build hook needs to run bundle install itself and then run a Jekyll build.
We need also two other files: routes.yaml and services.yaml. services.yaml is used to configure additional services like databases so we don't need it for that project. Just create the file:
mkdir .platform
touch services.yaml
Add routes.yaml in the .platform folder, and add the following configuration:
"https://{default}/":
  type: upstream
  upstream: "jekyll:http"
This file tells the platform router to direct all incoming requests to our jekyll container.
The last step is to create the appropriate Gemfile for our dependencies:
source "https://rubygems.org"
gem "jekyll", "~> 3.8.5"
gem "minima", "~> 2.0"
group :jekyll_plugins do
  gem "jekyll-feed", "~> 0.6"
end
gem "tzinfo-data", platforms: [:mingw, :mswin, :x64_mingw, :jruby]
gem "wdm", "~> 0.1.0" if Gem.win_platform?
Commit these new files:
git add .platform.app.yaml .platform Gemfile
git commit -m "Add platform.sh configuration"
5. Test and deploy
Now, we're ready to deploy the project on Platform.sh. Push the repository to the new remote:
git push platform masterThen Platform.sh will build and deploy your app, containerized onto our grid, with the following output:
Counting objects: 3, done.
Delta compression using up to 4 threads.
Compressing objects: 100% (3/3), done.
Writing objects: 100% (3/3), 613 bytes | 613.00 KiB/s, done.
Total 3 (delta 2), reused 0 (delta 0)

Validating submodules

Validating configuration files

Processing activity: Guillaume Moigneu pushed to Master
    Found 4 new commits

    Building application 'jekyll' (runtime type: ruby:2.5, tree: db94bb7)
      Generating runtime configuration.

      Executing build hook...
        The dependency tzinfo-data (>= 0) will be unused by any of the platforms Bundler is installing for. Bundler is installing for ruby but the dependency is only for x86-mingw32, x86-mswin32, x64-mingw32, java. To add those platforms to the bundle, run `bundle lock --add-platform x86-mingw32 x86-mswin32 x64-mingw32 java`.
        Fetching gem metadata from https://rubygems.org/...........
        Fetching public_suffix 3.0.3
        Installing public_suffix 3.0.3
        ...
        Configuration file: /app/_config.yml
                    Source: /app
               Destination: /app/_site
         Incremental build: disabled. Enable with --incremental
              Generating...
               Jekyll Feed: Generating feed for posts
                            done in 0.424 seconds.
         Auto-regeneration: disabled. Use --watch to enable.

      Executing pre-flight checks...

      Compressing application.
      Beaming package to its final destination.

      Provisioning certificates
Environment certificates
- certificate 43e7fdd: expiring on 2019-05-19 13:12:37+00:00, covering master-7rqtwti-<project ID>.<region>.platformsh.site


Re-deploying environment <project ID>-master-7rqtwti
Environment configuration
  jekyll (type: ruby:2.5, size: S, disk: 5120)

Environment routes
  http://master-7rqtwti-<project ID>.<region>.platformsh.site/ redirects to https://master-7rqtwti-<project ID>.<region>.platformsh.site/
  https://master-7rqtwti-<project ID>.<region>.platformsh.site/ is served by application `jekyll`
Let's review the output of your push. After a basic Git push output, Platform.sh kicks in and runs the build script. Under where it says Executing build hook you can see it downloading the Ruby dependencies and executing Jekyll:
        Configuration file: /app/_config.yml
                    Source: /app
               Destination: /app/_site
         Incremental build: disabled. Enable with --incremental
              Generating...
               Jekyll Feed: Generating feed for posts
                            done in 0.424 seconds.
         Auto-regeneration: disabled. Use --watch to enable.
Platform.sh then checks that everything seems correct and deploys the container to a host. You'll see that Platform.sh also generates the Let's Encrypt TLS certificate for your project.
Environment routes
  http://master-7rqtwti-<project ID>.<region>.platformsh.site/ redirects to https://master-7rqtwti-<project ID>.<region>.platformsh.site/
  https://master-7rqtwti-<project ID>.<region>.platformsh.site/ is served by application `jekyll`
The last output is your application's new URL. You can also check that the project has been successfully deployed on the web interface:
Now, go the URL, and you'll be able to see your Jekyll site. You can quick-start this process by cloning our Jekyll example on Github.
Read the rest of the series: Four days, four languages, four frameworks:
- Day 1, Java: Running Brightspot CMS on Platform.sh
- Day 2, Go: Hugo, a fast static site generator
- Day 3, React and Node: GatsbyJS—the React-based static site generator