 Switching to Platform.sh can help IT/DevOps organizations drive 219% ROI
 Organizations, the ultimate way to manage your users and projects


Recently, Platform.sh hosted a live stream on our Deploy Friday Q & A series called Gatsby & headless CMS, including Strapi, Drupal, and Oracle Content & Experience. Robert Douglass and I met with representatives from Gatsby, Strapi, and Oracle to talk about one thing: the headless CMS and its relation to the static site generator, Gatsby.
So what's a "headless CMS?" It’s a development pattern that, inline with developing microservices, places importance on decoupling services from your primary application (i.e., Gatsby) to build your sites. That's the "headless" bit—some service serves something (e.g., ecommerce capabilities or authentication)—and a Gatsby site connects to that service and leverages its data when building the final app.
As for the CMS part of "headless CMS," the content your app is going to serve—articles and blog posts, for example—are actually edited and reside on a separate service. The content is served from that service and, in the case of Gatsby, is called upon during builds to fill out the main site, however you designate it to be displayed.
There’s an ecosystem of source plugins for Gatsby that can be configured to pull in this content at build time, delivering pre-rendered HTML as a result. Instead of pushing API calls to those servers client-side, they’re placed at build time, decreasing users’ page load time considerably. At the cost of a slightly longer build time, that's a pretty good advantage, and content only lags behind the backend CMS as far as the last build.
We can separate our content from our Gatsby application: engineers can focus on the site itself; creative contributors can add content to the backend easily; and users experience greater performance when they visit the site.
But will it deploy (on Platform.sh)? Of course!
Deploying the headless CMS to Platform.sh
Platform.sh is the superior way to deploy a headless application. Why? Because with Platform. sh, you can run both the head (Gatsby) and the CMS (for example, WordPress or Strapi) with the same tools, the same development process, and the same SLAs—without additional vendor relationships or costs.
Let’s get started with our multiapp project. First, we'll go into a little detail about how we can configure a two-application Gatsby project with either Strapi or WordPress as the backend.
Overview
For both Strapi and WordPress backends, we're going to use the same multiapp project structure:
.platform/
gatsby/
  .platform.app.yaml
  <application code>
  gatsby-config.js
<backend>/
  .platform.app.yaml
  <application code>
Our Gatsby application is isolated to the gatsby subdirectory, and either backend code we use will also be located in its own subdirectory. Each app will have its own .platform.app.yaml file to describe its type, name, build process and how to start it.
Note:
This post focuses primarily on deploying Gatsby with a connected backend CMS, rather than the details specific to writing new components and templates in Gatsby to display content. Both templates—Gatsby with Strapi and Gatsby with WordPress—are based on separate tutorials from Strapi and Gatsby that, respectively, go into much more detail—if you’re interested in building those pages from scratch.
The primary file we'll be concerned with modifying for both of our backends is the gatsby/gatsby-config.js. Inside that file, we can define all of the source plugins that will actually add our backend content to the Gatsby data layer using GraphQL. That file has the following structure:
module.exports = {
  siteMetadata: {
    title: "My site",
    description: "Description of site",
    author: "Chad Carlson",
  },
  plugins: [
    "gatsby-plugin-without-settings",
    {
      resolve: `gatsby-plugin-with-settings`,
      options: {
        name: `images`,
        path: `${__dirname}/src/images`,
      },
    },
    ...
  ],
}
We’re going to add a source plugin to this plugins attribute for each backend:
During builds, Gatsby will use these modules to place queries against the backend app, making content accessible to display on the site. We're also going to use the Node.js Config Reader library to access the backend relationship within our gatsby-config.js file, by adding it to the options for each of the source plugins listed above. So, we need to add it to our dependencies:
yarn add platformsh-configand import it in the first line of gatsby-config.js:
const config = require("platformsh-config").config();Finally, we're going to modify how our Gatsby template typically builds on Platform.sh for both backends:
name: gatsby

type: "nodejs:12"

hooks:
  post_deploy: |
    npm run build

relationships:
  <backend>: "<backend>:http"

web:
  locations:
    "/":
      root: "public"
      index: ["index.html"]
      scripts: false
      allow: true

disk: 1024

mounts:
  "/.cache":
    source: local
    source_path: cache
  "public":
    source: local
    source_path: public
The above file includes a relationship to the backend application; we’ll use this relationship to provide content to Gatsby. Notice that we've moved Gatsby's build process from the build hook to the post_deploy hook. Now that we’ve granted access to the backend with a relationship, it won’t be available until after the deploy hook. We still need to get that content to Gatsby, so we've moved npm run build to the post_deploy hook to get around this, and given write access to the .cache and public directories that will be created.
Pulling Strapi content into Gatsby
For Strapi, we're going to place all of our code inside a strapi subdirectory, and name the application strapi in its .platform.app.yaml file.
If you haven't already tried Strapi, I’d recommend you do. Strapi is a headless CMS that provides a simple UI that makes building APIs super simple. If you compare our Strapi template to the contents of the strapi subdirectory of the Gatsby-Strapi template, you'll see that the code is identical except for a single line.
Namely in the build script build.sh, we've added the following:
yarn strapi install graphqlThis line installs the GraphQL plugin, allowing GraphQL queries to be placed on the API Strapi automatically builds out.
In our routes.yaml file, we define three routes for our two applications. Two upstreams and a redirect:
"https://www.{default}/":
  type: upstream
  upstream: "gatsby:http"

"https://{default}/":
  type: redirect
  to: "https://www.{default}/"

"https://backend.{default}/":
  type: upstream
  upstream: "strapi:http"
Our installation of Strapi is going to use PostgreSQL to store its data, so we also add that service definition to our projects services.yaml file:
dbpostgres:
  type: postgresql:12
  disk: 256
Okay, those are all the changes we need to make to Strapi to set this up. What about Gatsby?
First, we can modify the relationships block of Gatsby's .platform.app.yaml file now that we've named the Strapi app:
relationships:
  strapi: "strapi:http"
Second, we need to add the source plugin for Strapi (gatsby-source-strapi) to our dependencies with the following command:
yarn add gatsby-source-strapiSo that we can add the following block to the plugins attribute of our gatsby-config.js file:
// gatsby-config.js
  plugins: [
    ...
    {
      resolve: "gatsby-source-strapi",
      options: {
        apiURL: `http://${config.credentials("strapi")["host"]}`,
        contentTypes: [
          "article",
          "category",
        ],
        queryLimit: 1000,
    },
    ...
  ]
Here, instead of providing a static URL for the Strapi backend, we're using the Node.js Config Reader library to look up the strapi relationship and build a string for that URL.
We've also defined the two primary contentTypes we want Gatsby to be concerned about: articles and categories. All calls to Strapi will be concerned with these two endpoints, so we’ll need to add them to Strapi for this to work (more on this later).
In Gatsby, we can control how our Strapi content is displayed by templating GraphQL queries in our pages, components, and template scripts. The tutorial our template is based on goes into much greater detail about these changes, but we can look at one example from our src/pages/index.js file, which lists all of the articles or blog posts served from Strapi:
import React from "react";
import { StaticQuery, graphql } from "gatsby";
import Layout from "../components/layout";
import ArticlesComponent from "../components/articles";
import "../assets/css/main.css";
const IndexPage = () => (
<Layout>
<StaticQuery
query={graphql`
query {
allStrapiArticle {
edges {
node {
strapiId
title
category {
name
}
image {
publicURL
}
}
}
}
}
`}
render={data => (
<div className="uk-section">
<div className="uk-container uk-container-large">
<h1>Strapi blog</h1>
<ArticlesComponent articles={data.allStrapiArticle.edges} />
</div>
</div>
)}
/>
</Layout>
);
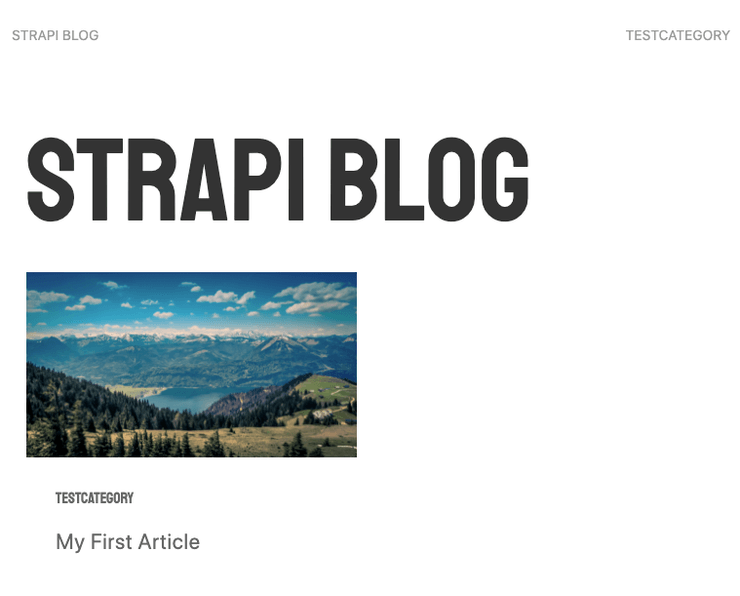
export default IndexPage;This file builds the index page by placing a StaticQuery on Strapi, retrieving all of its articles and using the ArticlesComponent defined in components/articles.js to display their images, title, and a snippet of their content.
Now, we can deploy our repository to Plaform.sh. When we do so, however, our primary route for our Master environment is going to give us a 403 response; this is expected. Gatsby is trying to pull content from Strapi, when Strapi hasn't been set up with any content to serve. So let's add some.
If we visit the backend.<generated-url> URLfor our environment, Strapi will prompt us to first create an admin user. Once we do that, we'll have access to the admin dashboard and begin creating our content types.
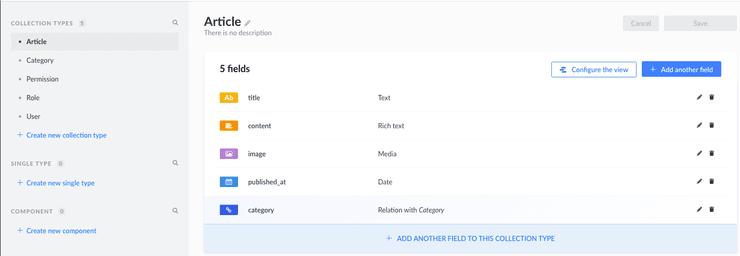
In our Gatsby app, we specified that we wanted two content types: article and category. We create an article collection so that every article we post contains the required fields title, content, image, and published_at for the publish date. Then create a category collection with only the single field name. Finally, we add a "Relation" field to article to category, such that a category contains many articles.
Note: You can find more detailed information about these steps in the template's README.
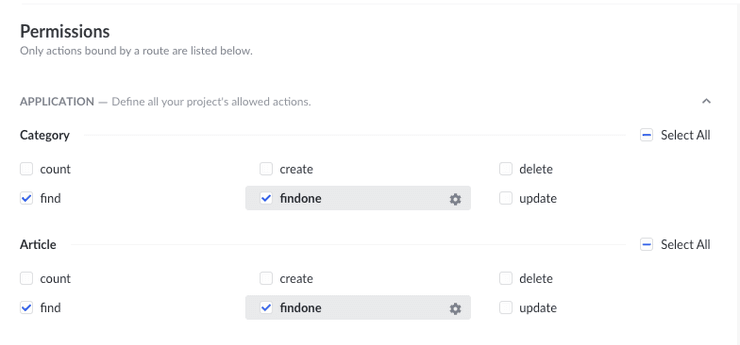
We save our changes and add a test article that belongs to some test category. Once we do, we can modify our permissions to make the articles and categories endpoints public.
Now that we have content being served from our Strapi backend, we can redeploy the project with the command platform redeploy, and our Gatsby app will pull that content when it builds.
Pulling WordPress content into Gatsby
Setting up WordPress to deploy with Gatsby is very similar to Strapi. We're going to put all of our WordPress code in a wordpress subdirectory. Then name the app wordpress, and modify the backend route we described previously to match:
"https://backend.{default}/":
  type: upstream
  upstream: "wordpress:http"
Our standard WordPress template uses MariaDB instead of PostgreSQL, so we'll need to update our services.yaml file as well:
db:
  type: mariadb:10.4
  disk: 512
Now, let's update our Gatsby application. First, the relationships block needs to match WordPress in its .platform.app.yaml:
relationships:
  wordpress: "wordpress:http"
Then we'll need to update gatsby-config.js to use the gatsby-source-wordpress plugin, instead, by first installing it
yarn add gatsby-source-wordpressand including it in gatsby-config.js:
// gatsby-config.js
  plugins: [
    ...
    {
      resolve: `gatsby-source-wordpress`,
      options: {
        baseUrl: config.credentials("wordpress")["host"],
        protocol: `http`,
        hostingWPCOM: false,
        useACF: true,
      },
    },
    ...
  ]
Just like Strapi, we define the URL for the backend, this time with the wordpress relationship. We don’t need to include the http:// with that URL, because gatsby-source-wordpress provides a separate protol attribute to include it. We don’t need to specify contentTypes in this case, either.
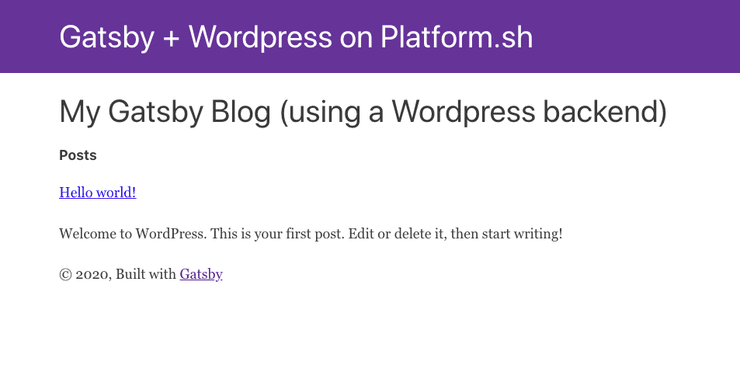
If we take a look at our pages/index.js as its modified for WordPress, we can see that it looks very similar to Strapi, but has been modified to the specific queries that need to be placed on the built-in Wordpress's GraphQL, using allWordpressPost instead:
import React from "react";
import { Link, graphql } from "gatsby";
import Layout from "../components/layout";
import SEO from "../components/seo";

export default ({ data }) => {
  return (
    <Layout>
      <SEO title="home" />
      <h1>My Gatsby Blog (using a Wordpress backend)</h1>
      <h4>Posts</h4>
      {data.allWordpressPost.edges.map(({ node }) => (
        <div key={node.slug}>
          <Link to={node.slug}>
            <p>{node.title}</p>
          </Link>
          <div dangerouslySetInnerHTML={{ __html: node.excerpt }} />
        </div>
      ))}
    </Layout>
  );
};

export const pageQuery = graphql`
  query {
    allWordpressPost(sort: { fields: [date] }) {
      edges {
        node {
          title
          excerpt
          slug
        }
      }
    }
  }
`;Now that our code has been set up, we push to Platform.sh, and run into the same 403 response we did with Strapi. In this case, it's because WordPress has not been fully installed on that container yet. We just need to visit the backend.<generated-url> URL for our environment, and complete the installation.
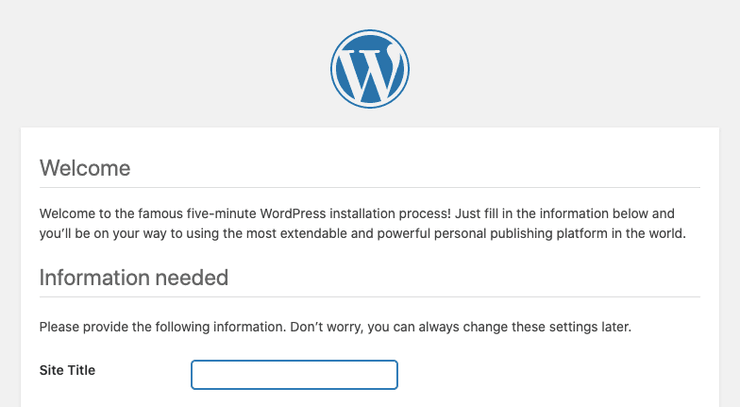
When the install has completed, WordPress already comes with a starter "Hello world" post, so there’s no need to create any additional content. After, we once again platform redeploy, and our Gatsby WordPress app is off and running!
Simple, straightforward headless CMS pattern deployment
Deploying the headless CMS pattern on Platform.sh is simple and straightforward once you define your cluster. The great thing is that your team can focus on developing the app itself, leveraging best-in-class source plugins, rather than reinventing the wheel for each added feature. Same goes for content.
With a few changes, we got Gatsby talking to both a Strapi and a WordPress backend, pulling in content to build the final application. I invite you to try it out yourself with the resources below. Take care!
Our webinar that explores Gatsby and the headless CMS pattern is now available on demand. Be sure to check it out below, and click on through to the YouTube playlist to see the rest of the series.
Resources and references
- Platform.sh multiapp documentation
- Deploy Friday: E02 Gatsby & headless CMS, including Strapi, Drupal, and Oracle Content & Experience
- Gatsby + Strapi template
gatsby-source-strapidocumentation- Blog: Build a static blog with Gatsby and Strapi
- Gatsby + WordPress template
gatsby-source-wordpressdocumentation- WordPress Source Plugin Tutorial