 Switching to Platform.sh can help IT/DevOps organizations drive 219% ROI
 Organizations, the ultimate way to manage your users and projects


Apache Kafka is a community-distributed streaming platform that has three key capabilities: publish and subscribe to streams of records, store streams of records in a fault-tolerant durable way, and process streams as they occur. Apache Kafka has several success cases in the Java world, including website activity tracking, metrics collection and monitoring, log aggregation, and real-time analytics. This post will cover how to benefit from this powerful tool in the Jakarta EE/MicroProfile universe.
Apache Kafka core concepts
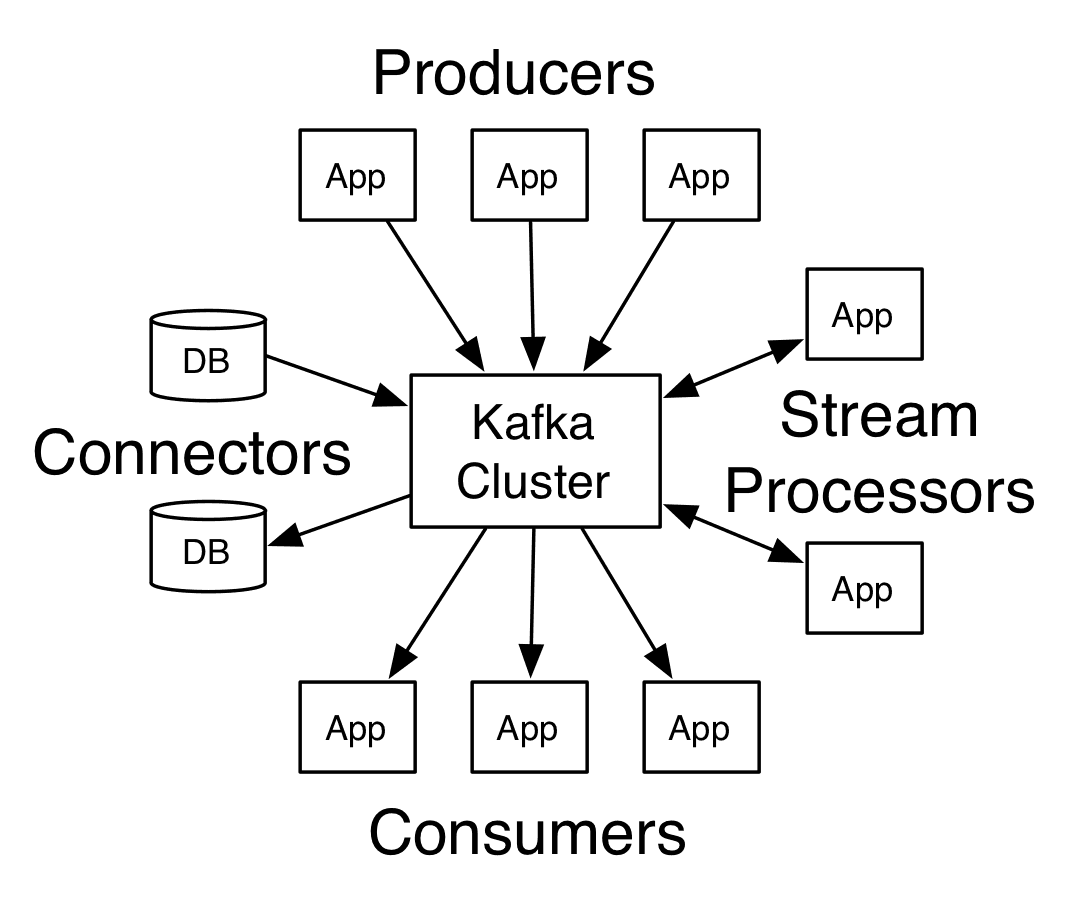
Kafka is run as a cluster on one or more servers that can span multiple data centers. A Kafka cluster stores a stream of records in categories called topics, and each record consists of a key, a value, and a timestamp. As seen in the documentation, Kafka has four core APIs:
- The Producer API. Allows an application to publish a stream of records to one or more Kafka topics.
- The Consumer API. Allows an application to subscribe to one or more topics and to process the stream of records published to those topics.
- The Streams API. Allows an application to act as a stream processor, consuming an input stream from one or more input topics, and producing an output stream to one or more output topics to effectively transform the input streams to output streams.
- The Connector API. Allows building and running reusable producers or consumers that connect Kafka topics to existing applications or data systems.
Show me the code
To illustrate how Kafka works, we'll create a named counter, which will fire an event through Apache Kafka with an HTTP request and store it in a Redis database using Sorted Sets. The first step is to set the Maven dependency and the configuration code. Let's define a pom.xml with their libraries. Beyond the Eclipse MicroProfile dependency, we'll add Jakarta NoSQL to handle Redis and a CDI extension to work with Apache Kafka.
<?xml version="1.0" encoding="UTF-8"?>
<project xmlns="http://maven.apache.org/POM/4.0.0" xmlns:xsi="http://www.w3.org/2001/XMLSchema-instance"
     	xsi:schemaLocation="http://maven.apache.org/POM/4.0.0 http://maven.apache.org/maven-v4_0_0.xsd">
	<modelVersion>4.0.0</modelVersion>
	<groupId>sh.platform.template</groupId>
	<artifactId>microprofile-kumuluzee</artifactId>
	<version>1.0.0-SNAPSHOT</version>
	<packaging>jar</packaging>

	<properties>
    	<version.microprofile>2.2</version.microprofile>
    	<maven.compiler.source>1.8</maven.compiler.source>
    	<maven.compiler.target>1.8</maven.compiler.target>
    	<failOnMissingWebXml>false</failOnMissingWebXml>
    	<kumuluzee.version>3.5.0</kumuluzee.version>
    	<platform.sh.version>2.2.2</platform.sh.version>
    	<project.build.sourceEncoding>UTF-8</project.build.sourceEncoding>
    	<jakarta.nosql.version>0.1.0-SNAPSHOT</jakarta.nosql.version>
	</properties>

	<dependencies>
    	<dependency>
        	<groupId>com.kumuluz.ee</groupId>
        	<artifactId>kumuluzee-microProfile-1.0</artifactId>
    	</dependency>
    	<dependency>
        	<groupId>sh.platform</groupId>
        	<artifactId>config</artifactId>
        	<version>${platform.sh.version}</version>
    	</dependency>
    	<dependency>
        	<groupId>org.aerogear.kafka</groupId>
        	<artifactId>kafka-cdi-extension</artifactId>
        	<version>0.1.0</version>
    	</dependency>
    	<dependency>
        	<groupId>org.eclipse</groupId>
        	<artifactId>yasson</artifactId>
        	<version>1.0.4</version>
    	</dependency>
    	<!--drivers-->
    	<dependency>
        	<groupId>org.eclipse.jnosql.diana</groupId>
        	<artifactId>redis-driver</artifactId>
        	<version>${jakarta.nosql.version}</version>
    	</dependency>
	</dependencies>

	<build>
    	<finalName>microprofile</finalName>
    	<plugins>
        	<plugin>
            	<groupId>com.kumuluz.ee</groupId>
            	<artifactId>kumuluzee-maven-plugin</artifactId>
            	<version>${kumuluzee.version}</version>
        	</plugin>
    	</plugins>
	</build>

	<dependencyManagement>
    	<dependencies>
        	<dependency>
            	<groupId>com.kumuluz.ee</groupId>
            	<artifactId>kumuluzee-bom</artifactId>
            	<version>${kumuluzee.version}</version>
            	<type>pom</type>
            	<scope>import</scope>
        	</dependency>
    	</dependencies>
	</dependencyManagement>

	<repositories>
    	<repository>
        	<id>oss.sonatype.org-snapshot</id>
        	<url>http://oss.sonatype.org/content/repositories/snapshots</url>
        	<releases>
            	<enabled>false</enabled>
        	</releases>
        	<snapshots>
            	<enabled>true</enabled>
        	</snapshots>
    	</repository>
	</repositories>

</project>
A minimal configuration in the project is a class using the @KafkaConfig annotation. You can use either the hardcoded host and port, or the values of the parameters to be replaced from the properties.
import org.aerogear.kafka.cdi.annotation.KafkaConfig;

@KafkaConfig(bootstrapServers = "#{kafka_host}:#{kafka_port}")
public class Config {

	static final String TOPIC = "topic";

	static final String GROUP_ID = "group";
}
Here, we'll also plug in the Redis client using the Java Config reader library, making the integration between the Java application and Platform.sh easier.
import org.eclipse.jnosql.diana.redis.keyvalue.RedisBucketManagerFactory;
import org.eclipse.jnosql.diana.redis.keyvalue.RedisConfiguration;
import org.eclipse.jnosql.diana.redis.keyvalue.SortedSet;
import sh.platform.config.Config;
import sh.platform.config.Redis;

import javax.enterprise.context.ApplicationScoped;
import javax.enterprise.inject.Produces;

@ApplicationScoped
public class RedisConfig {

	@Produces
	@ApplicationScoped
	public SortedSet redisConfig() {
    	Config config = new Config();
    	final Redis redis = config.getCredential("redis", Redis::new);
    	RedisConfiguration configuration = new RedisConfiguration();
    	final RedisBucketManagerFactory bucketFactory = configuration.get(redis.get());
    	return bucketFactory.getSortedSet("names");
	}
}
On the Apache Kafka side, let's create a class that will publish the name counted in the stream.
import org.aerogear.kafka.SimpleKafkaProducer;
import org.aerogear.kafka.cdi.annotation.Producer;

import javax.enterprise.context.ApplicationScoped;
import javax.json.JsonObject;
import java.util.logging.Logger;

@ApplicationScoped
public class NameCounterPublisher {

	private static final Logger LOGGER = Logger.getLogger(Logger.class.getName());
	@Producer
	private SimpleKafkaProducer<Integer, String> producer;

	public <T> void sendMessage(String name) {
    	LOGGER.info("received the name " + name);
    	producer.send(Config.TOPIC, name);
	}

}
The last step is the listener, the instance where the listener events will be hosted. This class will receive the name and then count it using Redis NameCounter class.
import org.aerogear.kafka.cdi.annotation.Consumer;

import javax.enterprise.context.ApplicationScoped;
import javax.inject.Inject;

@ApplicationScoped
public class NameCounterListener {

	@Inject
	private NameCounter counter;

	@Consumer(topics = Config.TOPIC, groupId = Config.GROUP_ID)
	public void receiver(final String name) {
    	counter.count(name);
	}

}
The NameCounter will increment the amount from the name and return the current status as a Map where the key is the name, and the value is the counter.
import org.eclipse.jnosql.diana.redis.keyvalue.SortedSet;

import javax.enterprise.context.ApplicationScoped;
import javax.inject.Inject;
import java.util.Map;
import java.util.stream.Collectors;

@ApplicationScoped
public class NameCounter {

	@Inject
	private SortedSet sortedSet;


	public void count(String name) {
    	sortedSet.increment(name, 1L);
	}

	public Map<String, Long> getResult() {
    	return sortedSet.getRevRanking()
            	.stream()
            	.collect(Collectors.toMap(e -> e.getMember(),
                    	e -> e.getPoints().longValue()));
	}
}
The last step is the HTTP client, a smooth request, where the GET method returns the result, and the POST method inserts a name to be counted.
import javax.enterprise.context.RequestScoped;
import javax.inject.Inject;
import javax.ws.rs.Consumes;
import javax.ws.rs.GET;
import javax.ws.rs.POST;
import javax.ws.rs.Path;
import javax.ws.rs.Produces;
import javax.ws.rs.core.MediaType;
import java.util.Map;

@Path("names")
@RequestScoped
@Consumes(MediaType.APPLICATION_JSON)
@Produces(MediaType.APPLICATION_JSON)
public class NameCounterResource {

	@Inject
	private NameCounter counter;

	@Inject
	private NameCounterPublisher publisher;

	@GET
	public Map<String, Long> getResult() {
    	return counter.getResult();
	}

	@POST
	public void count(String name) {
    	publisher.sendMessage(name);
	}

}
Platform.sh structure
The Platform.sh structure is still the same as in the first Java post, and it won't impact your application in any way. Indeed, Platform.sh is a PaaS that facilitates integration where, through infrastructure by code, you can configure the services that your application needs.
Since we're using both Redis and Apache Kafka, we'll update the services file to define them.
mykafka:
  type: kafka:2.2
  disk: 512

redisdata:
  type: redis-persistent:5.0
  disk: 256
In the .platform.app.yaml file, we’ll list the services as relationships—the names the application will use (paired with the necessary credentials) to connect to them:
# This file describes an application. You can have multiple applications
# in the same project.
#
# See https://docs.platform.sh/user_guide/reference/platform-app-yaml.html

# The name of this app. Must be unique within a project.
name: app

# The runtime the application uses.
type: "java:8"

disk: 1024

# The hooks executed at various points in the lifecycle of the application.
hooks:
  build: mvn -DskipTests clean package kumuluzee:repackage

mounts:
  '/app':
    source: local
    source_path: app_source

# The relationships of the application with services or other applications.
#
# The left-hand side is the name of the relationship as it will be exposed
# to the application in the PLATFORM_RELATIONSHIPS variable. The right-hand
# side is in the form `<service name>:<endpoint name>`.
relationships:
  kafka: "mykafka:kafka"
  redis: "redisdata:redis"

# The configuration of app when it is exposed to the web.
web:
  commands:
  	start: |
      mv target/microprofile.jar app/microprofile.jar
      java -jar -Xmx512m -Dkumuluzee.server.http.port=$PORT -Dkafka_host=kafka.internal -Dkafka_port=9092 app/microprofile.jar
The application is now ready, so it’s time to move it to the cloud with Platform.sh using the following steps:
- Create a new free trial account.
- Sign up as a new user and set a password, or login using a current GitHub, Bitbucket, or Google account. If you use a third-party login, you’ll be able to set a password for your Platform.sh account later.
- Select the region of the world where your site should live.
- Select the blank template.
After this wizard, Platform.sh will provision the whole infrastructure to you and will offer a Git remote repository. Before access, remember to set the SSH keys. The Platform.sh Git-driven infrastructure means it will automatically manage everything your application needs to push it to the master remote repository.
With the project created, add the repository as a remote for your local code, commit the changes, and push to Platform.sh:
git remote add platform <platform.sh@gitrepository>
git commit -m "Initial project"
git push -u platform master
The code pushed will provision the Java application and services, and when it’s done, will return an IP address to the service. Let’s test the application. To test a REST application, an HTTP client is OK.
curl -X POST -k -H 'Content-Type: application/json' -i 'https://<service.ip>/names' --data '"otavio"'
curl -X POST -k -H 'Content-Type: application/json' -i 'https://<service.ip>/names' --data '"poliana"'
curl -X POST -k -H 'Content-Type: application/json' -i 'https://<service.ip>/names' --data '"otavio"'
curl -X POST -k -H 'Content-Type: application/json' -i 'https://<service.ip>/names' --data '"ada"'
curl https://<service.ip>/names
#result output here
In this post, we created an integration with Redis and Apache Kafka, the most famous key-value NoSQL database. And we’ve seen how natural it is to work with both Redis and Jakarta NoSQL. Redis is a NoSQL database in-memory, which means read/write operations are faster.